
In the first two articles (Part 1, Part 2) of this series, we looked at why it's important to split (or partition) cache data when handling large amounts of information. We also talked about common problems like hotspot issues and explained how consistent hashing can help solve them. Then, we compared different ways to connect caching systems to applications - using built-in cache libraries, sidecar proxies, and centralized proxy setups - each with their own pros and cons. These articles gave a solid theoretical background that’s helpful for Expert Generalists and software architects to understand key ideas about caching, consistent hashing, and system design choices for managing cache.
In this article, we’ll show how to put the ideas from the previous posts into practice with a real-world example. We'll use Twemproxy (also called Nutcracker) as a caching proxy for Memcached, and apply Ketama consistent hashing to spread cache keys evenly across several Memcached instances. This hands-on example will demonstrate how to build a scalable caching setup in Kubernetes, giving a more practical and specialist view of the concepts we discussed earlier.
You can find the full source code on GitHub at github.com/handsonarchitects/memcached-example.
We’ll begin by explaining what Twemproxy is and how it works as part of a caching system. Then, we’ll walk through how to set it up with Memcached and Ketama consistent hashing. Finally, we’ll show you how to deploy everything in Kubernetes and test that it works as expected.
What is Twemproxy?
Twemproxy, also called Nutcracker, is a fast and lightweight open-source tool made by Twitter. It acts as a middle layer between your app and cache systems like Memcached or Redis. Twemproxy makes it easier to manage multiple cache servers by giving your app one simple way to connect to them all.
Let’s go over the main features of Twemproxy:
- Single access point for caching: Twemproxy gives your application one entry point to talk to many cache servers. This makes your code cleaner and easier to manage. It supports both Memcached and Redis protocols, so you can switch between them with only small changes in your code. Just keep in mind that Memcached and Redis protocols are not the same, so your app still needs to know which one it’s using.
- Key partitioning: Twemproxy automatically spreads cache keys across multiple servers to balance the load and avoid performance issues (hotspots). It supports several consistent hashing methods like ketama (the most common), fnv1a_64, murmur3_32, and modula (a basic modulo approach). These are built into Twemproxy and easy to use, so developers can focus on their app instead of hashing logic.
- Handles changing setups: If you add or remove cache servers, Twemproxy updates itself automatically - no need to change your app code. It updates its internal routing (hash ring) and reassigns keys to the right servers. This makes it easy to scale the cache or replace failing nodes without disruption.
- Built-in fault handling: Twemproxy monitors the health of each cache server. If one becomes unhealthy, it removes that server from the active pool so no new requests go to it. The keys are then automatically rerouted to healthy servers using consistent hashing, helping your system stay available.
- Efficient with resources: Twemproxy reuses a small set of persistent connections to each backend server instead of creating a new one for every request. This reduces connection overhead and improves performance - especially useful when Twemproxy is used as a centralized dedicated caching layer in front of many servers.
- Stateless by design: Twemproxy doesn’t store any data itself. It just passes requests between your app and the cache. This makes it easy to scale and manage. Because it’s stateless, you can run it either as a sidecar container next to your app in Kubernetes or as a separate service - both options work well.
These features make Twemproxy a strong tool for managing cache clusters, especially in large distributed systems. Since it’s stateless and handles changing topologies well, you can use it in many ways - like as a sidecar in Kubernetes or as a standalone proxy layer.
In this article, we’ll focus on the sidecar deployment in Kubernetes, which is a common approach for managing caching in modern cloud-native applications.
How to configure Twemproxy as a sidecar container in Kubernetes
In the previous article, we discussed the pros and cons of running a caching proxy as a sidecar - covering deployment complexity, scalability, and operational overhead. In this post, we will focus on two key benefits of the sidecar approach: easier network setup and automatic scaling.
When we deploy Twemproxy as a sidecar container (a container running alongside the application container inside the same Kubernetes Pod), we use the local network interface to connect to the caching proxy. This lets the application talk to Twemproxy using localhost, which makes network configuration simpler and reduces latency. There are no extra network hops or DNS lookups involved.
Since the sidecar runs in the same Pod as the application, it scales together with the application. When the application Pod scales up or down, the Twemproxy sidecar scales too, keeping the caching proxy layer aligned with the application instances. This setup means each application Pod has its own Twemproxy, so multiplexing connections to the cache is limited. However, this trade-off is often worth it for the simplified networking and automatic scaling benefits.
The diagram below shows the architecture of our example application, illustrating how Twemproxy runs as a sidecar container in a Kubernetes Pod next to the application container:
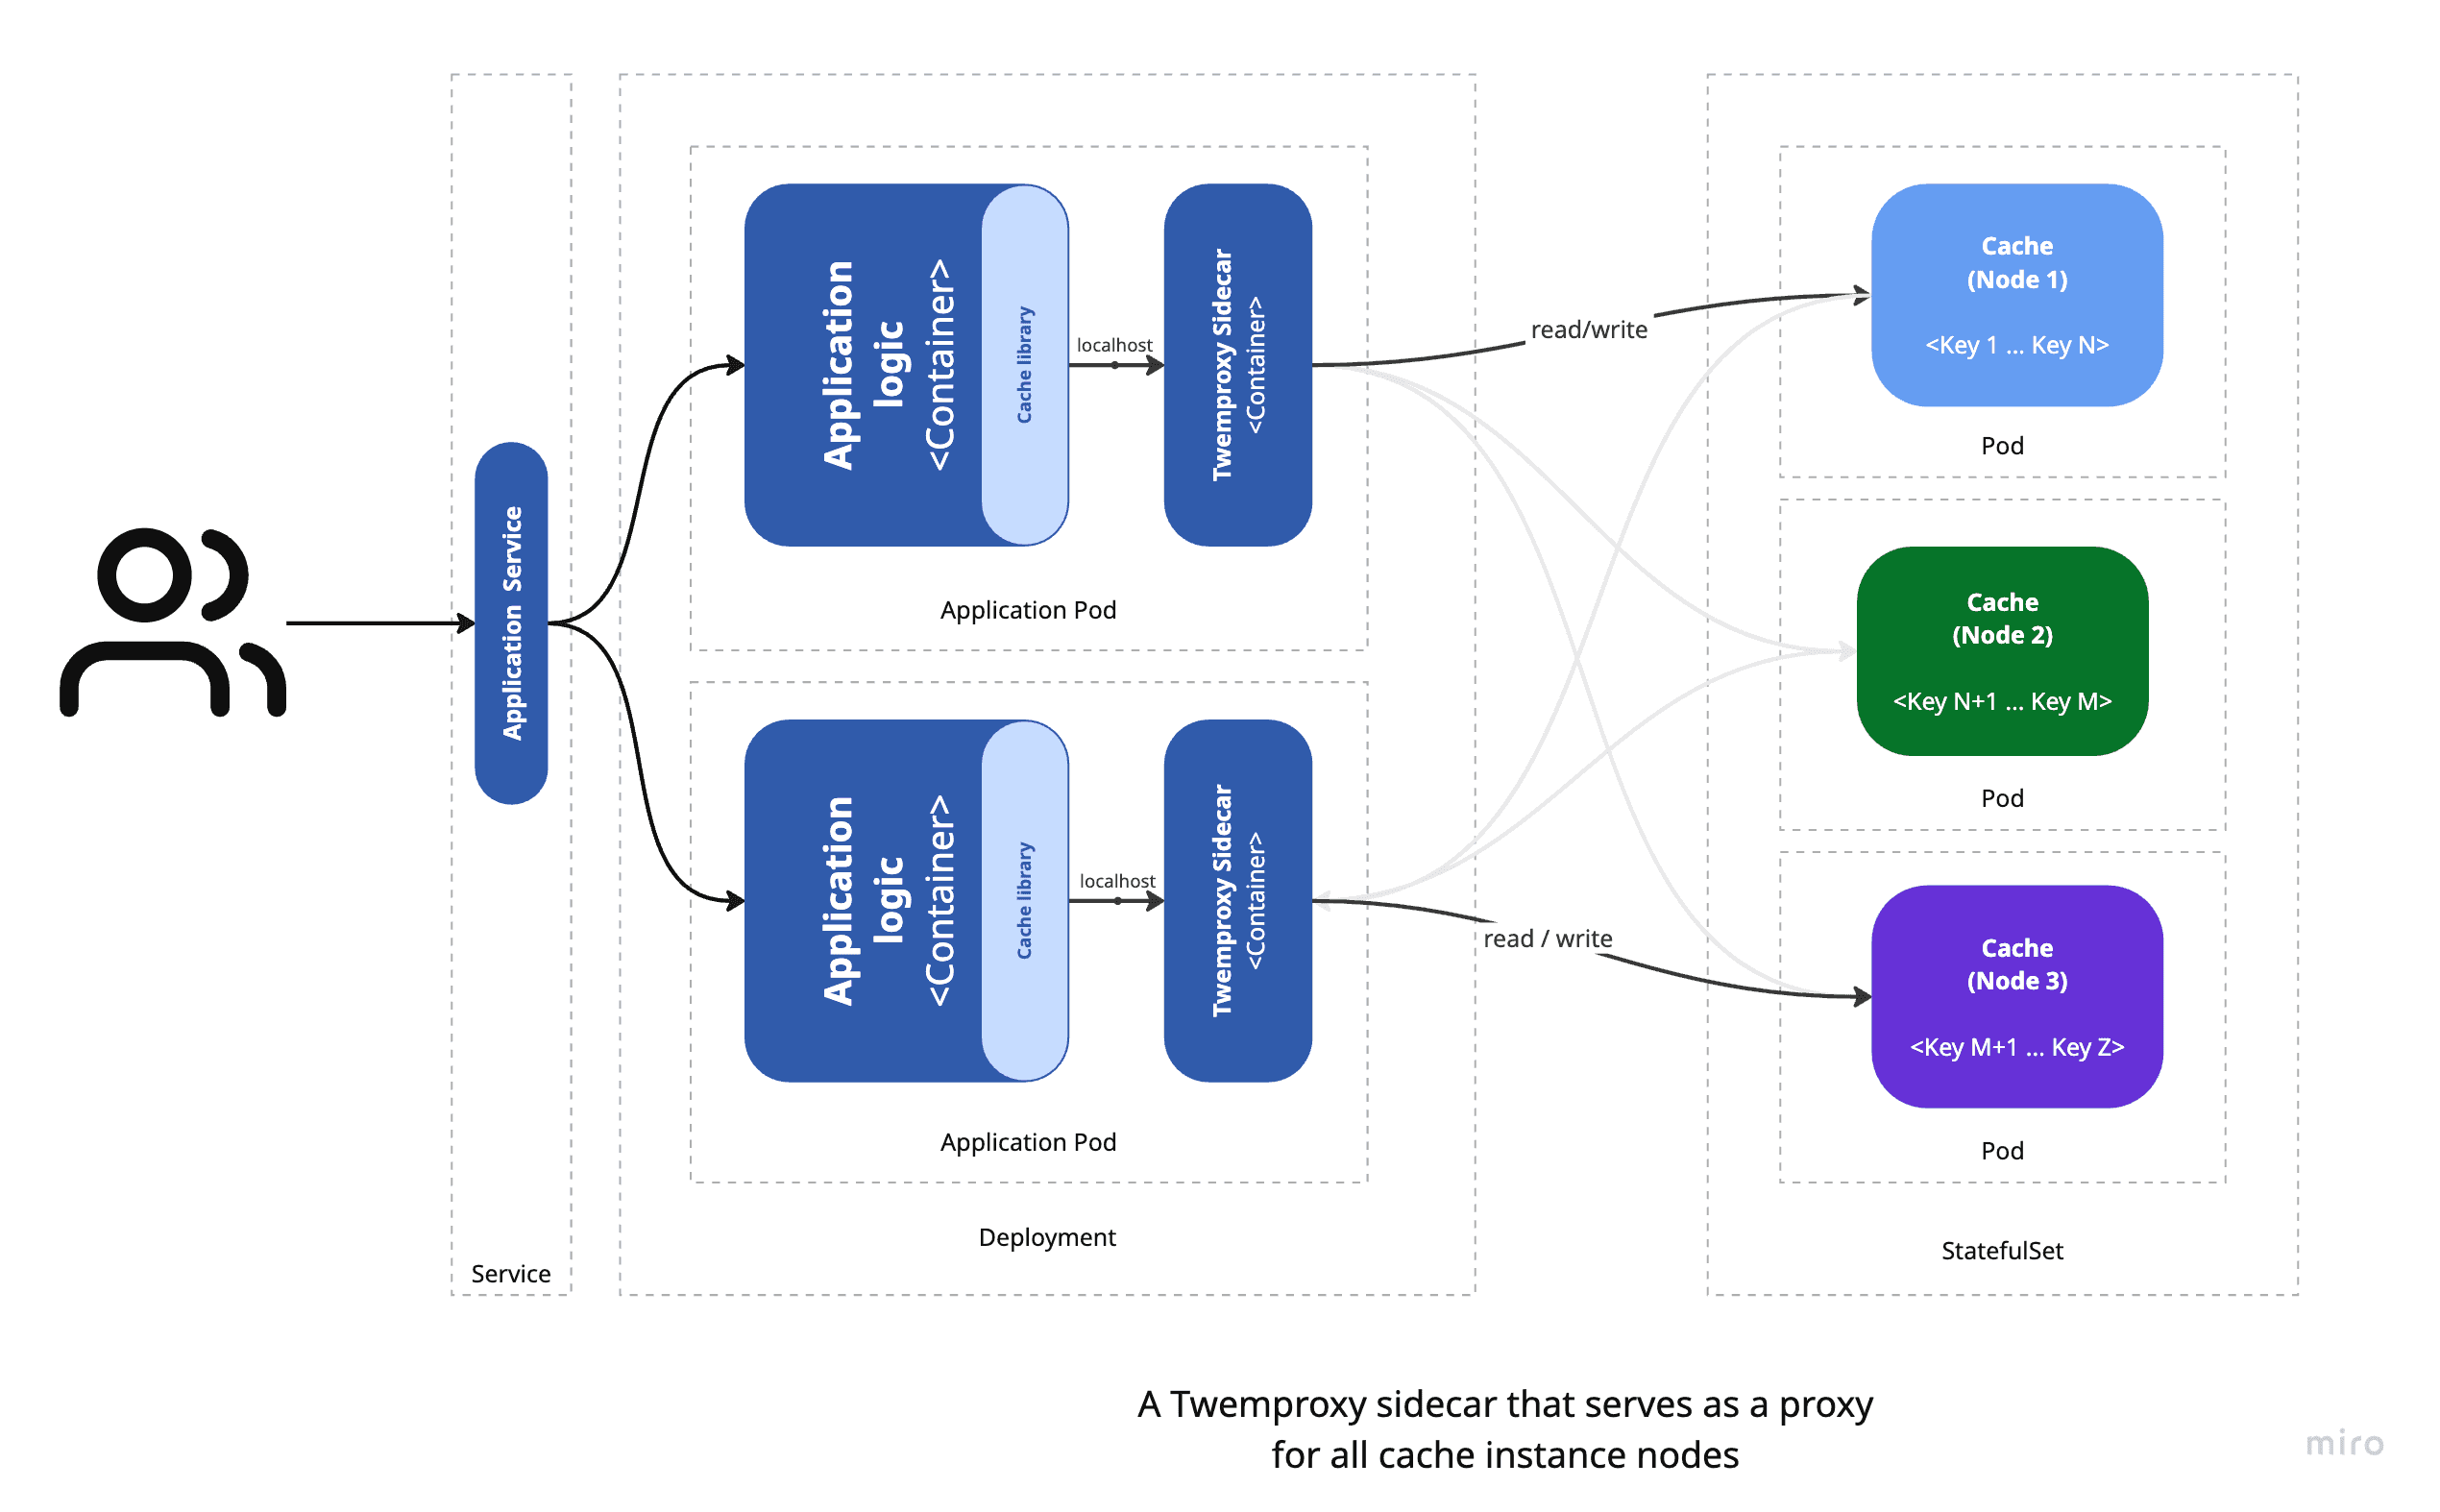
Each application Pod contains two containers:
- The application container, which exposes a REST API to interact with the cache.
- The Twemproxy sidecar container, which acts as a caching proxy and manages all communication between the application and the cache instances.
The application talks to Twemproxy on localhost:11211, the default Memcached port. You can scale the application Pods horizontally by running multiple replicas, allowing load balancing and high availability. Each replica has its own Twemproxy sidecar, ensuring the caching proxy layer stays consistent across all application instances.
The cache instances are deployed as a StatefulSet, which gives each instance a stable network identity and persistent storage. This allows Twemproxy to use fixed hostnames for the cache servers, keeping the caching layer stable even if instances scale up or down.
In this design, Twemproxy handles all cache partitioning and provides a single cache interface to the application. The application doesn’t need to know how the cache is split, which makes maintenance and scaling easier.
Next, let’s see how to configure Twemproxy to work with Memcached and Ketama consistent hashing in Kubernetes.
High-Availability Memcached Cluster
To build a high-availability Memcached cluster in Kubernetes, we use a StatefulSet to manage Memcached instances. StatefulSets provide stable network names and persistent storage, allowing the cluster to scale while keeping data consistent. We deploy the Memcached StatefulSet with a Helm chart, which simplifies deployment and configuration.
The Helm chart is available at bitnami/charts.
In our example, we deploy two Memcached replicas using a StatefulSet. This StatefulSet uses a headless service so each Memcached instance has a stable hostname like memcached-cluster-0.memcached-cluster and memcached-cluster-1.memcached-cluster. Twemproxy uses these hostnames to configure the cache topology.
Deploy the Memcached StatefulSet with this Helm command:
helm install memcached-cluster \
  --set architecture="high-availability" \
  --set replicaCount=2 \
  oci://registry-1.docker.io/bitnamicharts/memcached
Configuring the Twemproxy sidecar container
Twemproxy needs a configuration file (usually nutcracker.conf) to define the cache topology, including cache servers, hashing algorithm, and other settings. This file is typically in YAML format.
In our example, the configuration is generated dynamically in Dockerfile's entrypoint script using environment variables passed to the Twemproxy container. This lets us change the cache setup without changing or redeploying the application. See the Dockerfile for details on how this works.
After processing environment variables, the config looks like this:
memcached:
  listen: 127.0.0.1:11211
  hash: "fnv1a_64"
  distribution: "ketama"
  auto_eject_hosts: "true"
  timeout: "2000"
  server_retry_timeout: "2000"
  server_failure_limit: "1"
  servers:
    - memcached-cluster-0.memcached-cluster:11211:1
    - memcached-cluster-1.memcached-cluster:11211:1
The servers list defines the Memcached hostnames, ports, and weights for key distribution. hash sets the hashing algorithm, distribution controls how keys are spread across instances, and auto_eject_hosts lets Twemproxy remove unhealthy servers automatically.
You can update the cache cluster by changing the SERVERS environment variable in the Twemproxy container, without touching application code or redeploying:
env:
- name: SERVERS
    value: memcached-cluster-0.memcached-cluster:11211:1,memcached-cluster-1.memcached-cluster:11211:1
Configuring the Application Container
Our application uses pymemcache (a Python Memcached client) to talk to Twemproxy. It reads the MEMCACHED_HOST environment variable to know where to connect:
client = base.Client((os.getenv("MEMCACHED_HOST", "localhost"), 11211))
value = client.get(key)
The application container is configured with:
env:
- name: MEMCACHED_HOST
  value: localhost
This points the app to the Twemproxy sidecar on the local Pod network.
Application Pod Specification
Here’s an example Kubernetes Pod spec including both containers:
spec:
    containers:
    - image: handsonarchitects/memcached-api
    ...
    env:
    - name: MEMCACHED_HOST
        value: 127.0.0.1
    ...
    - image: handsonarchitects/memcached-sidecar
    ...
    env:
    - name: SERVERS
        value: memcached-cluster-0.memcached-cluster:11211:1,memcached-cluster-1.memcached-cluster:11211:1
This spec is part of the deployment manifest k8s/memcached-api-deployment.yaml, which controls scaling and replication.
Testing and Observability
To test Twemproxy distributing cache keys across Memcached instances, we created a Kubernetes job that runs a Bash script. The script generates cache keys and uses curl to call the app’s REST API in parallel. This helps test the cache layer under load. The job definition is in k8s/tools-cache-generator-job.yaml.
After the job finishes, check app Pod logs to confirm cache keys were created and stored. Then, check cache stats on each Memcached instance using the stats command via telnet.
Use this command to connect and check stats:
kubectl run get-memcached-stats --image nginx:alpine --restart Never --rm -it --command -- curl telnet://memcached-cluster-0.memcached-cluster:11211Replace memcached-cluster-0 with memcached-cluster-1 to check the other instance.
Inside the telnet session, run stats to see cache stats, and quit to exit.
Source code and example
The full example code, including Twemproxy sidecar setup, Memcached StatefulSet deployment, and the simple Python API, is available on GitHub: github.com/handsonarchitects/memcached-example. Clone and follow the README to deploy it in your Kubernetes cluster.
Summary
This is the third article in our caching series focused on large-scale, data-intensive applications. Here, we showed how to build a scalable caching layer using Twemproxy, Memcached, and Ketama consistent hashing in Kubernetes. We covered the benefits of running Twemproxy as a sidecar, including easier network setup, automatic scaling, and dynamic cache management. We also demonstrated how to deploy a high-availability Memcached cluster with StatefulSets and how to configure Twemproxy to work with it. Finally, we provided a simple app example and tested the caching layer under load.
We hope this practical guide, together with our previous articles (Part 1, Part 2), helps you build better caching solutions for cloud-native applications.